# 以特步小游戏为例入门CreateJS
# 目的
复盘特步小游戏,分享这个小游戏的实现思路以及介绍CreateJS的基本用法。
# CreateJS 介绍
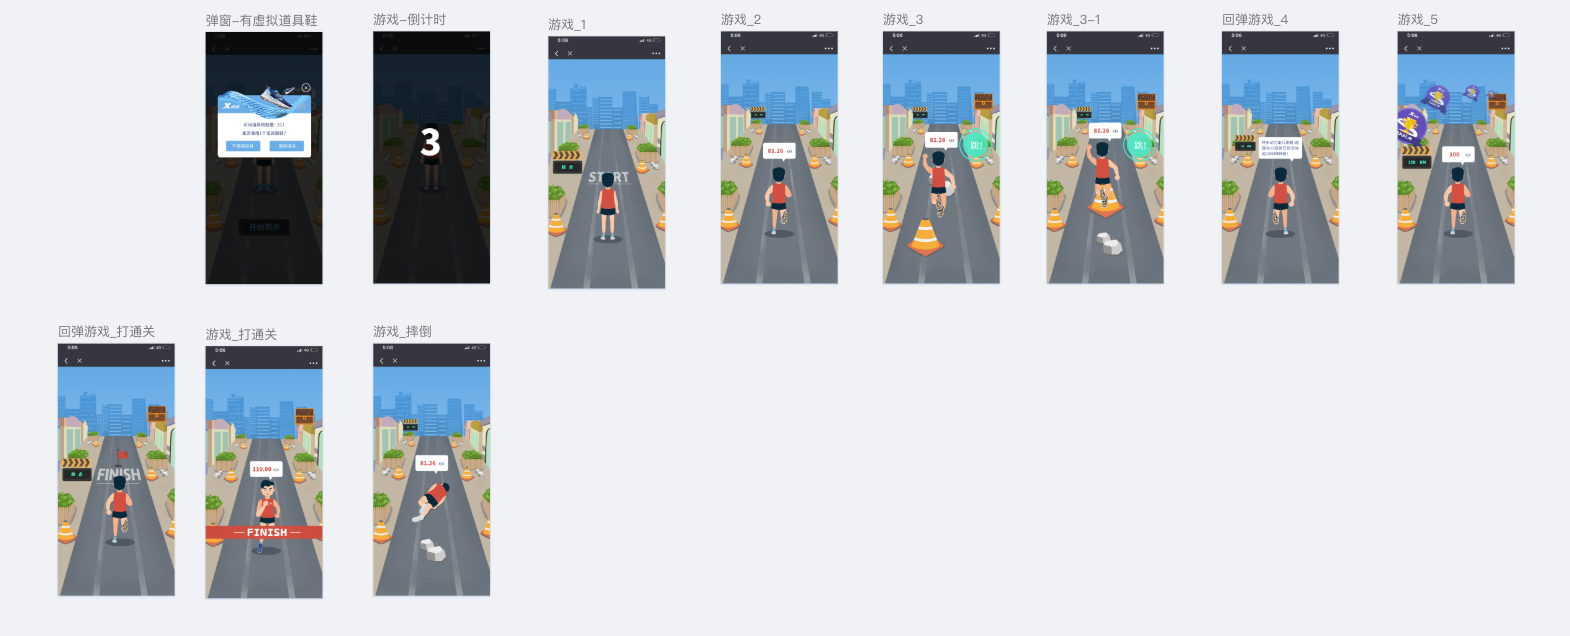
# 特步小游戏设计稿以及最终效果
# CreateJS简介
CreateJS 是基于 HTML5 开发的用于实现 HTML5游戏、动画和交互应用的模块化库和工具。包含以下四个部分:
- EaselJS: 用于 Sprites、动画、向量和位图的绘制。简化h5 canvas的操作(核心部分)。
- TweenJS: 动画效果引擎。
- SoundJS: 音频播放引擎。
- PreloadJS: 预加载资源:图像、视频、声音、JS、或其他数据(SVG、JSON、JSONP、XML)。
这四个部分都可以单独引用,可选
# PreloadJS
PreloadJS实现预加载图片,并显示进度
let assetsPath = '//' + document.domain + '/activity/xtepgame/dist/assets/img/texture/'
// preferXHR | basePath | crossOrigin(Anonymous或者'*'表示允许跨域, 不需要xhr请求图片)
queue = new createjs.LoadQueue(false, assetsPath, 'Anonymous')

var manifest = [
  { src: 'new-bg.png', id: 'background' },
  // ...
]
queue.loadManifest(manifest)
queue.on('progress', () => {
  this.percent = Math.ceil(100 * queue.progress)
})
queue.on('complete', this.handleComplete, this)
2
3
4
5
6
7
8
9
10
11
12
13
Image跨域小坑: canvas 渲染不同源的图片会存在跨域问题,虽然有时候可以将跨域的图片成功渲染出来,但是这样会“污染” canvas,污染后就不能从画布提取数据,也就是不能
再调用 toDataURL() 和 getImageData() 方法,会抛出安全错误(security error)的提示。
解决图片跨域的解决方法:
- 图片所在的服务器设置 Access-Control-Allow-Origin "*" 响应头。
- nginx代理。
- 手动将 IMG 的 url 转换成当前域名的 url。 Blob, 详细处理方法, createjs imageLoader.js
# EaselJS(核心)
EaseJS, 增强了对 canvas 的操作。
# Stage
选取 HTML 中的一个 canvas 标签来创建一个 Stage,createJS中用到的所有元素都是添加到这个 Stage 当中,添加后通过 stage.update() 的方法即可将添加的元素显示在页面上。
<body>
  <canvas id="game" width="750" height="1624"></canvas>
</body>

<script>
  var stage = new createjs.Stage('game');
  // 添加元素...
  stage.update();
</script>
2
3
4
5
6
7
8
9
# 添加文字
// 显示的字符,字体及大小,颜色
var txt = new createjs.Text('HELLO', '20px Times', '#000');
// 创建完后可以随意改变坐标、对齐等其他属性
txt.x = 100
txt.y = 100
txt.text = 'hello world'
// 添加到stage才能正常显示
stage.addChild(txt)
2
3
4
5
6
7
8
# 添加图形
// 创建一个Graphics, 可以理解为有绘制能力的画笔
var g = new createjs.Graphics()
g.setStrokeStyle(1);
g.beginStroke('#000000');
g.beginFill('red');
// x, y, radius
g.drawCircle(0, 0, 30);
var shape = new createjs.Shape(g)
stage.addChild(shape)

// 第二种方式
var shape = new createjs.Shape()
shape.graphics.beginStroke("#000").beginFill("#ff0000").drawRect(0, 0, 100, 100);
stage.addChild(shape)
2
3
4
5
6
7
8
9
10
11
12
13
14
类似于改变坐标,增加阴影 Shadow, 透明度 Alpha, 缩小放大 ScaleX / ScaleY 都可以用 Shape 做到。
# 图片Bitmap
var bg = new createjs.Bitmap('./background.png');
stage.addChild(bg)
stage.update()
2
3
CreateJS 提供了几种处理图片的方式
给图片增加遮罩层
使用 mask 属性,可以只显示图片和 shape 相交的区域stage = new createjs.Stage('./background.png'); bg = new createjs.Bitmap('./example.png'); //遮罩图形 shape = new createjs.Shape(); shape.graphics.beginFill("#000").drawCircle(0, 0, 100); bg.mask = shape; //给图片bg添加遮罩 stage.addChild(shape); stage.addChild(bg); stage.update();1
2
3
4
5
6
7
8
9适用场景:裁剪图片,比如显示圆形的图片。
给图片增加滤镜效果
var blur = new createjs.BlurFilter(5,5,1);
bg.filters = [blur];
// 添加 filter 后刷新 Stage, filter 只能保持一帧的效果,第二帧 filter 则失效,
// 因此需要使用图片 cache() 方法后,使得 stage 刷新后仍然能保持住 filter 效果
bg.cache(0,0,bg.image.width,bg.image.height);
1
2
3
4
5适用场景:图片处理。
使用 Rectangle 剪裁图片
使用 EaseJS 内置的 Rectangle 对象来创建一个选取框, 显示图片的某个部分。bg = new createjs.Bitmap('./example.png'); var rect = new createjs.Rectangle(0, 0, 121, 171); bg.sourceRect = rect;1
2
3适用场景:拼图小游戏,裁剪图片。
# Sprite (精灵)以及 TweenJS 制作动画
先跳过,后面结合实际开发来介绍
# 容器Container
Container 容器可以包含Text 、Bitmap、Shape、Sprite等 EaselJS 元素在同一个组中,方便统一管理。
比如一个跑动的人由人物,气泡提示组成,可以把这几个部分放到同一个 Container 中,统一移动。
# 交互
想要与 stage 中的所有元素交互只需要添加事件监听即可,例如 addEventListener('click')、 addEventListener('mouseover')等。对于 stage 来说,有一个特别的事件 tick,类似于 setInterval 定时的运行一个函数,可以定时刷新 Stage 。
var stage;
function init() {
  stage = new createjs.Stage('game');
  stage.enableMouseOver();
  //

  // 理想
  createjs.Ticker.setFPS(60);
  createjs.Ticker.addEventListener('tick', update);
}

function update(event) {
  stage.update()
}
2
3
4
5
6
7
8
9
10
11
12
13
14
CreateJs 提供了两种渲染模式,一种是用 setTimeout ,一种是用 requestAnimationFrame,默认是 setTimeout ,默认的帧数是 20 ,一般的话还没有什么区别,但是如果动画多的话,设置成 requestAnimationFrame 模式的话,就会感觉到动画比较丝滑。
createjs.Ticker.timingMode = createjs.Ticker.RAF;
使用这种模式,Ticker 的帧频 FPS 就会忽略。
# 跑起来
# 简单的画板
通过Text、Shape、Container、addEventListener等基本内容,就可以实现一些简单的工具和小游戏了。
# 加速状态的汽车
通过移动背景和实时刷细腻,实现一个无缝连接的背景图,模拟汽车加速状态。
this.backdrop = new createjs.Bitmap(bg);
this.backdrop.x = 0;
this.backdrop.y = 0;
this.stage.addChild(that.backdrop);
this.w = bg.width;
this.h = bg.height;

//创建一个背景副本,无缝连接
var copyy = -bg.height;
this.copy = new createjs.Bitmap(bg);
this.copy.x = 0;
this.copy.y = copyy;  //在画布上 y 轴的坐标为负的背景图长
//使用 CreateJS 的 Tick 函数,逐帧刷新舞台
createjs.Ticker.addEventListener("tick", tick);
function tick(e) {
  if (e.paused !== 1) {
    //舞台逐帧逻辑处理函数
    that.backdrop.y = that.speed + that.backdrop.y;
    that.copy.y = that.speed + that.copy.y;

    if (that.copy.y > -40) {
      that.backdrop.y = that.copy.y + copyy;
    }
    if (that.copy.y > -copyy - 100) {
      that.copy.y = copyy + that.backdrop.y;
    }
  }
  that.stage.update(e);
}
2
3
4
5
6
7
8
9
10
11
12
13
14
15
16
17
18
19
20
21
22
23
24
25
26
27
28
29
# 拼图小游戏
通过对图片进行裁剪,addEventListener, 添加滤镜等方式,就可以实现一款简单的拼图小游戏。
# 小游戏思路以及关键步骤分步实现
# 思路
# 步骤
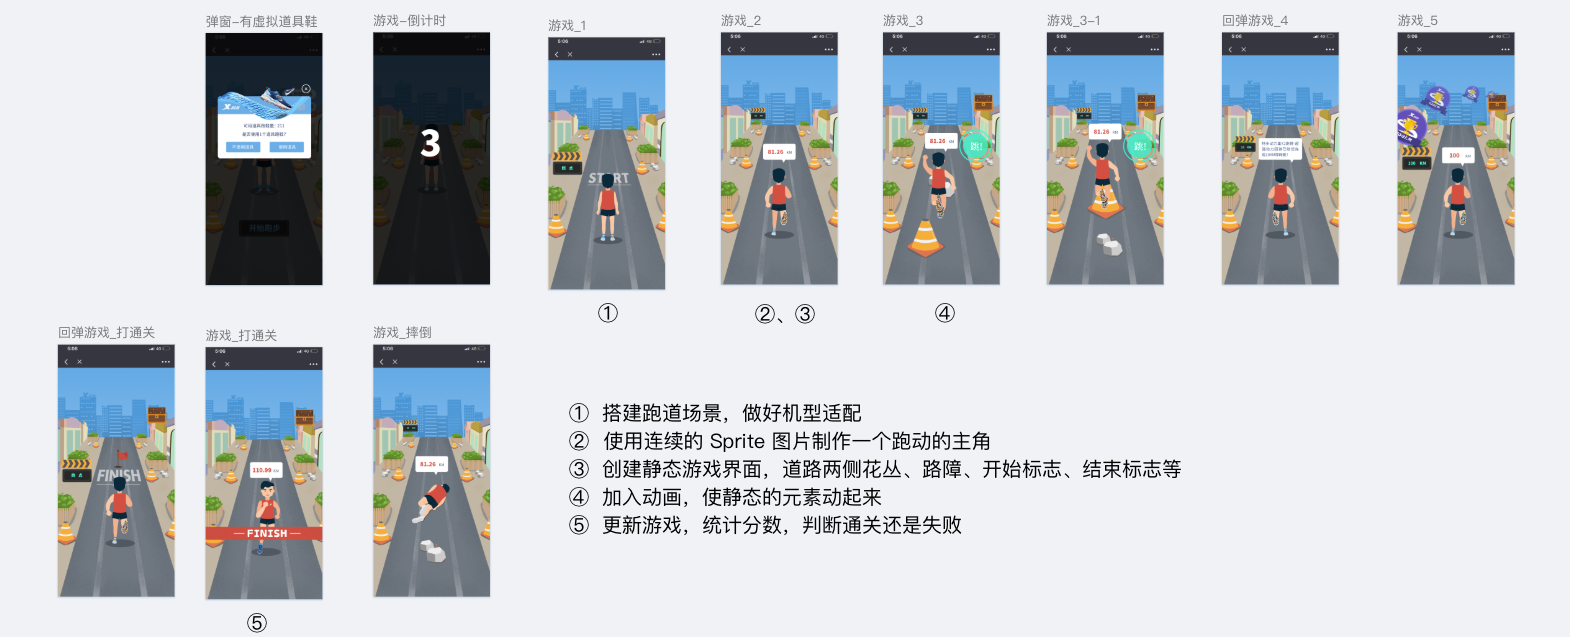
# 搭建跑道场景,做好机型适配
原理:整个游戏都在一个 canvas 上渲染,canvas 可以当做是一个内容会变化的图片,既然是图片,那么就可以借鉴 background-size: cover / contain 的思路进行适配。
- cover模式: 保持 canvas 比例,缩放 canvas 覆盖 viewport, 不在 viewport 范围的 canvas 隐藏或者裁剪。
- contain模式: 保持 canvas 比例,缩放 canvas 使其完全显示在 viewport 内,viewport 范围内可能会出现空白区域
// 按照设计图,设置绘图内容大小 750 * 1624
// 显示大小  375 * 812
// transform 不压缩比例变换,transform-origin 改变变换的原点
<canvas
  id="stage"
  :style="{width: `${375}px`, height: `${812}px`, transform: `scale(${ratio}, ${ratio})`, 'transform-origin': transformOrigin}"
  width="750" height="1624"
>

// 自适应
buildBackground() {
  let _background = queue.getResult('background')

  let backDrop = new createjs.Bitmap(_background)
  let backDropRatio = _background.width / _background.height
  let stageRatio = viewPort.w / viewPort.h

  // 计算原则:把最短边布满
  if (backDropRatio > stageRatio) {
    // fit height and center horizontally
    let fitHeightRatio = viewPort.h * 2 / _background.height
    let offsetLeft = viewPort.w * 2 / 2 - _background.width * fitHeightRatio / 2
    this.offsetLeft = offsetLeft
    this.ratio = fitHeightRatio
    // 默认transform-origin: 50% 50%;
    // 需求:不要遮挡上面的广告logo
    this.transformOrigin = '50% 0'
  } else {
    // fit horizontal and center vertically
    let fitWidthRatio = viewPort.w * 2 / _background.width
    let offsetHeight = (viewPort.h * 2 - _background.height * fitWidthRatio) / 2
    this.offsetHeight = offsetHeight
    this.ratio = fitWidthRatio
    this.transformOrigin = '0 50%'
  }
  stage.addChild(backDrop)
  stage.update()
}
2
3
4
5
6
7
8
9
10
11
12
13
14
15
16
17
18
19
20
21
22
23
24
25
26
27
28
29
30
31
32
33
34
35
36
37
38
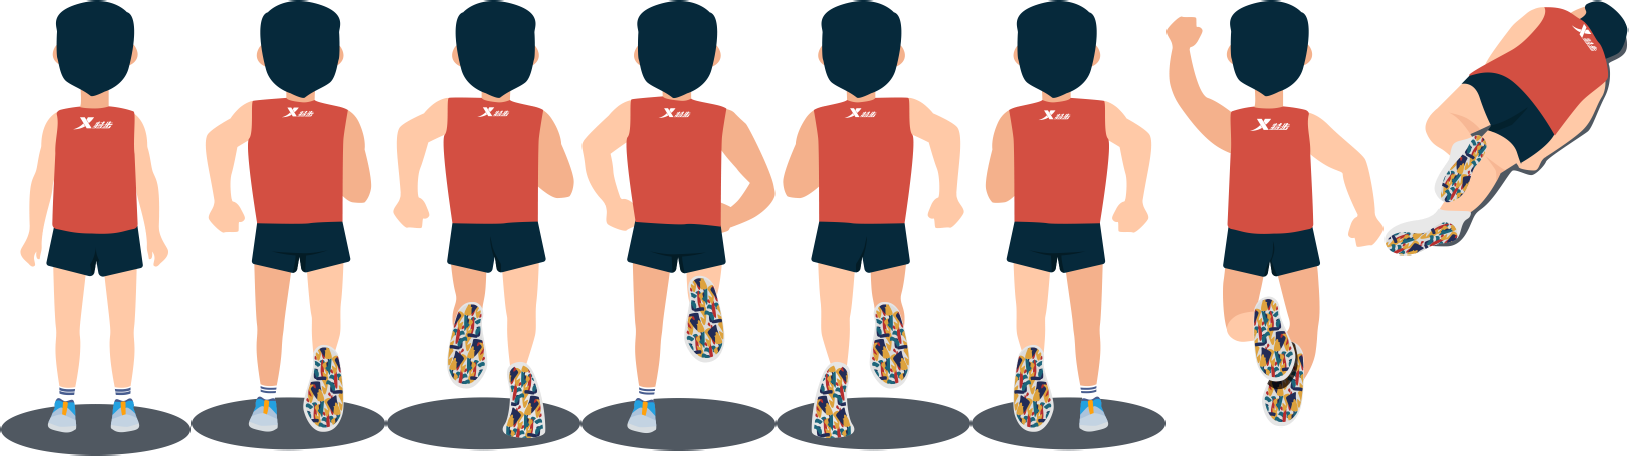
# 使用连续的 Sprite 图片制作一个跑动的主角
动画的原理是利用人的视觉残留效应,连续播放一系列的静止图片,即可获得一段动画,每张图片都可以称作动画的一帧。在 EaseJS 中,调用 new createjs.Sprite(SpriteSheet) 来创建 Sprite, SpriteSheet 可以理解为一个动画索需要的数据合集,包括动画的原始图像, 每一帧的尺寸数据,以及动画的帧数。在实际的开发中,通常用 TexturePacker 来制作 SpriteSheet ,而且软件还可以导出 createjs 可用格式的 json, 非常方便。导出后的 SpriteSheet 大体是这样的:
// 创建雪碧动画
playerWithShoeSs = new createjs.SpriteSheet({
  images: [queue.getResult('players')],
  framerate: 10,
  frames: [
    // x, y, width, height, imageIndex, regX, regY
    [1, 1, 189, 454, 0, 0, 0],
    [192, 1, 193, 449, 0, 0, 0],
    [387, 1, 193, 449, 0, 0, 0],
    [582, 1, 193, 449, 0, 0, 0],
    [777, 1, 193, 449, 0, 0, 0],
    [972, 1, 193, 449, 0, 0, 0],
    [1167, 1, 216, 426, 0, 0, 0],
    [1385, 1, 243, 254, 0, 0, 0]
  ],
  animations: {
    "man-stand": { frames: [0] },
    "run-man": { frames: [1, 2, 3, 4, 5], speed: .1 },
    "man-jump": { frames: [6] },
    "man-fall": { frames: [7] }
  },
}, 'players')

player = new createjs.Sprite(playerWithShoeSs, 'man-stand')
2
3
4
5
6
7
8
9
10
11
12
13
14
15
16
17
18
19
20
21
22
23
24
# 创建静态游戏界面
创建路边的参照物、路障、开始标志、结束标志、奖牌等静态元素。
# 加入动画
使用 TweenJS 来创建补间动画,简化操作。
// 跳跃
createjs.Tween
  .get(playerContainer, { ignoreGlobalPause: true})
  .to({y: playerContainer.y - jumpHeight}, 300, createjs.Ease.circOut)
  .to({y: playerContainer.y + jumpHeight}, 300, createjs.Ease.circIn)
  .call(() => {
    // 动画结束
    isJumping = false
    canPaused = true
    // 回到初始点
    playerContainer.setTransform(310, stage.canvas.height - playerContainer.getBounds().height - 500)
    player.gotoAndPlay("run-man")
})

// 参照物移动,逐渐放大, 近大远小
leftRoadRef.forEach((item, index) => {
  createjs.Tween
    .get(item)
    .wait(1500 * index)
    .to({x: -400, y: stage.canvas.height, scaleX: 1.4, scaleY: 1.4}, 3000, createjs.Ease.circIn)
})

// ...
2
3
4
5
6
7
8
9
10
11
12
13
14
15
16
17
18
19
20
21
22
23
# 更新游戏,检查是否通关或者失败
根据业务需求,游戏时长不超过 30 秒,总里程不超过 100 公里,根据时间换算成里程,进行里程更新
// 根据游戏总时间长度,更新里程
updateMile(e) {
  // 上一次tick到当前tick的ms
  let deltaS = e.delta
  currDuration += deltaS
  // 开头2.4s不计入计算
  if (currDuration >= 2400) {
    let percent = (currDuration - 2400) / gameDuration
    currentMile = (totalMile * percent / 1000).toFixed(2)
    let mileText = mileTextContainer.getChildByName('mile')
    mileText.text = currentMile
    this.finishedMile = currentMile
  }
}
2
3
4
5
6
7
8
9
10
11
12
13
14
# 总结
- 介绍了 CreateJS 核心概念及常用 API
- 根据常用的 API 实现小 Demo
- 介绍了特步小游戏的思路以及关键步骤实现